How I Made Over my Kitchen Cabinets for $500
Hey friends! I know as of late I’ve been on a bit of an emotional purge via social media and some of my posts. That type of writing is most definitely here to stay but of course, I will still be sharing the fun stuff with you like my obsession with home decor, recipes and little snippets of my favorite things. I like to keep it real + fun! A few things I am working on is a summer reading series. I just got a copy of Educated, A Memoir today and I can not wait to dive in. Especially after a recent podcast with the author really piqued my interest. It’s getting a lot of love from my friends as well.
- this post may contain affiliate links for items that I love
Also, I have been asked to participate in an online summer series with The Okayest Moms. This series is full of nuggets from amazing mamas in all realms. As the founders of this blog said, “Join us this summer as we celebrate little victories, learn from people who know more than us, laugh at our failures, and build up our village – because motherhood isn’t a journey that should be made alone.” I’ll be presenting on August 5th. I’d love for you to join me. You can check out the whole line up and register here.
Meanwhile, I finally finished my mini kitchen makeover. We have been in our home for 15 years but once our kids graduate high school, we’d like to move. Possibly back to Sacramento (I’m craving the energy that the city brings) and we will definitely downsize. That being said, we don’t want to dump a ton of money into our home. I’d love to redo all the things – granite, backsplash, appliances, and floors but money doesn’t grow on trees, my friends! If it does, can someone tell me where I can find a tree or even some seeds? I am also addicted to home decor and makeovers so I’m always looking for some way that I can change things up and make my home feel fresh again.
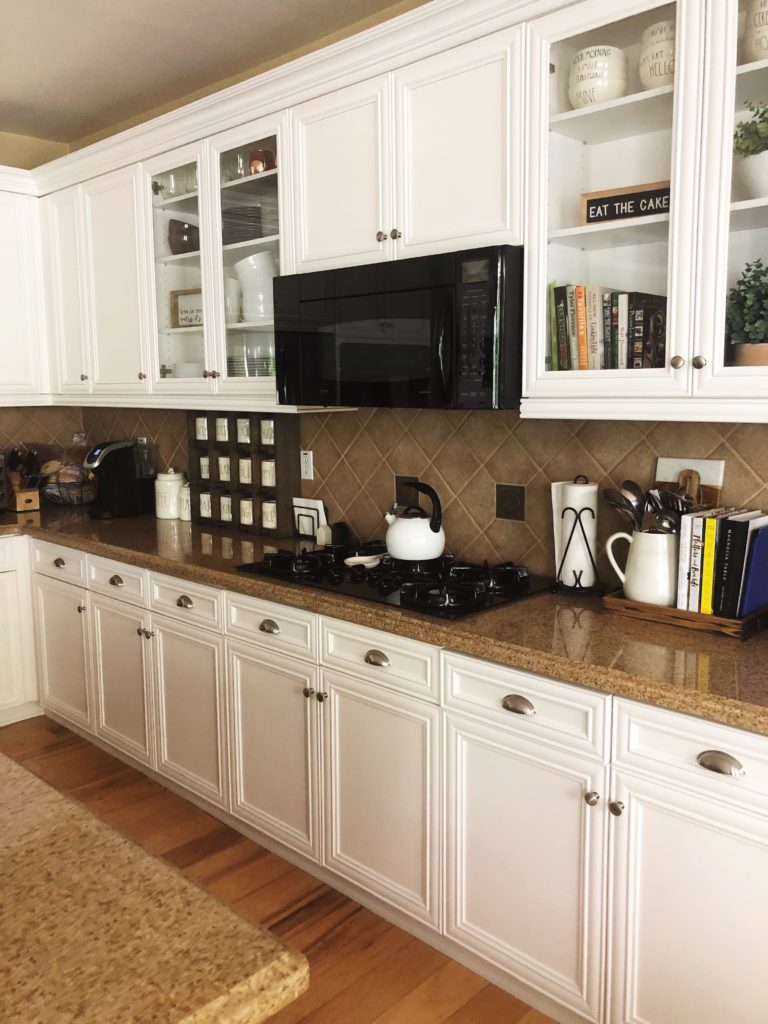
When we bought our home 15 years ago, we got to pick all of our upgrades and we knew what things were worth the splurges. At the time it was our cabinets and granite. Of course, that was in the season of brown. Now we are in the season of greys or neutrals. I mean really neutral. Think Scandinavian kind of neutral. At the time, we chose maple cabinets with an ivory glaze. They were beautiful and we received a ton of compliments over the years. A couple of things happened though. 1 – I got bored 2 – after 15 years they were starting to look yellow and dingy. So the obsession began. This is how all of my makeovers start. With a little flicker of a thought, then I obsess. I lay in bed and do the makeovers in my head. Like counting sheep. Yes, I am crazy like that!
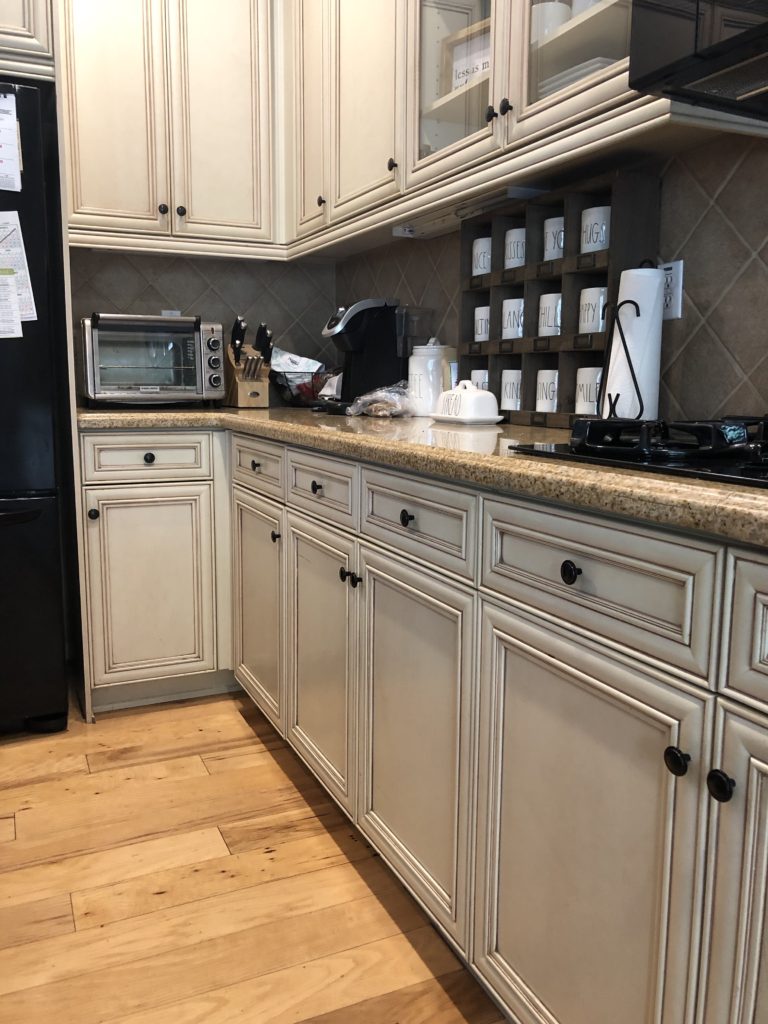
These are the original cabinets. Once upon a time I really did love them but after 15 years, it was time for a change.
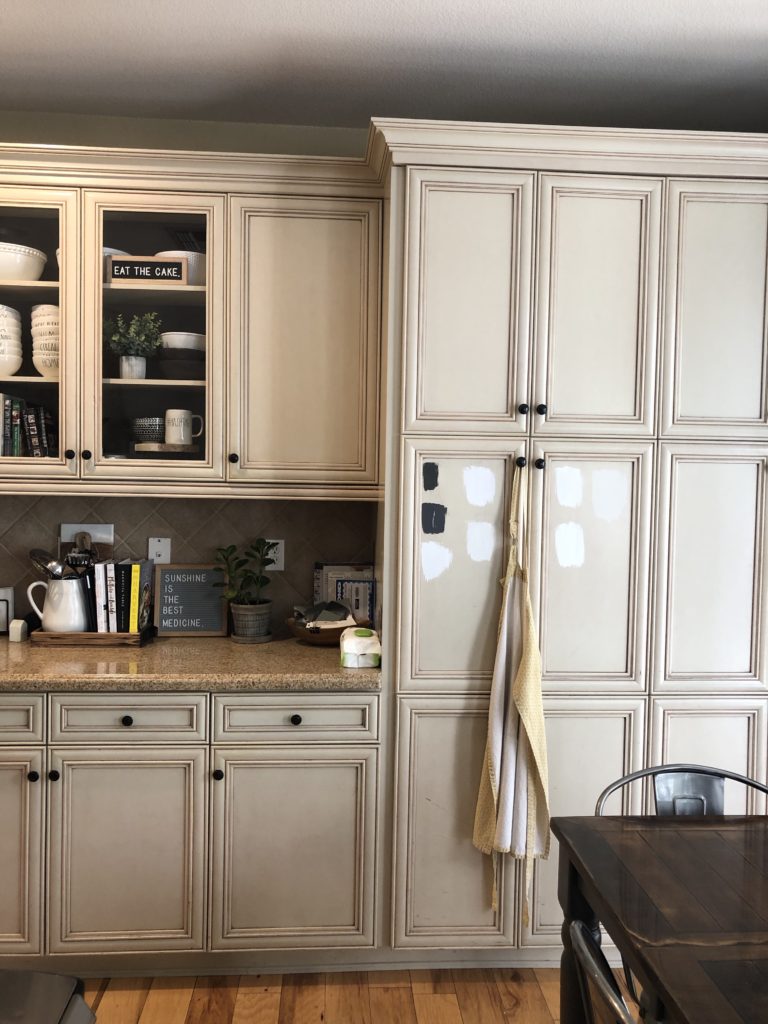
Originally my husband was very against white. So in trying to honor that, I was trying to choose colors that worked with my dark granite without making the room too dark or staying in the realm of cream cause why repaint your whole kitchen if it’s just going to be the same color? Insert gauntlet grey. This is the color (after numerous polka-dot samples adorned my cabinets) that we settled on. So I started the process. Honestly, I didn’t take pictures during the process. It was definitely messy and I pretty much had a constant ‘work station’ on my kitchen counter. I felt like a mad scientist with my various containers. I also had my paint trays and rollers to work on all of the trim.
The process looks like this:
- Remove all cabinets
- Label as needed (I usually write the number in the hole where the hardware goes and then cover the number with a piece of painters tape so that paint won’t cover the number)
- When I pulled the hinges off, I wrote a T or B for top or bottom as necessary and then I stick each set in a separate snack size ziplock with the corresponding cabinet number written on the front
- Clean cabinets with TSP substitute. I chose the substitute because it doesn’t require being rinsed. From some of the reviews I read, if you miss a spot in the wipe-off process with regular TSP, it could cause your paint not to stick. I didn’t want to take that chance.
- Sand cabinets to take off the sheen. I used a medium grit sanding pad. Doing this by hand seemed more efficient and less messy than using the sander.
- Wipe cabinets down with a damp cloth to remove all dust.
- I had an assembly line in the garage using saw horses, a few large pieces of scrap particle board and these awesome paint pyramid stands.
- Inside I taped off the areas that were against the walls and floors using this tape.
When I did the island, I hand painted and rolled everything. It was a lot of work and I knew that the rest of the kitchen would take a really long time so I decided to invest in a sprayer (similar) which was a whole new experience for me.
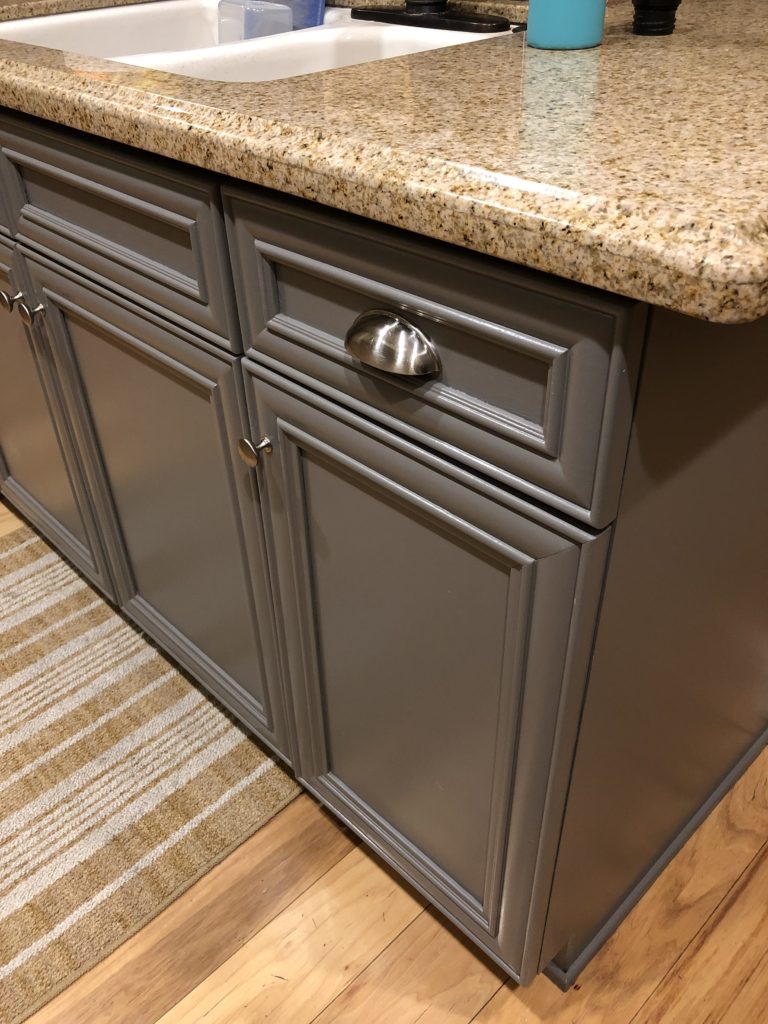
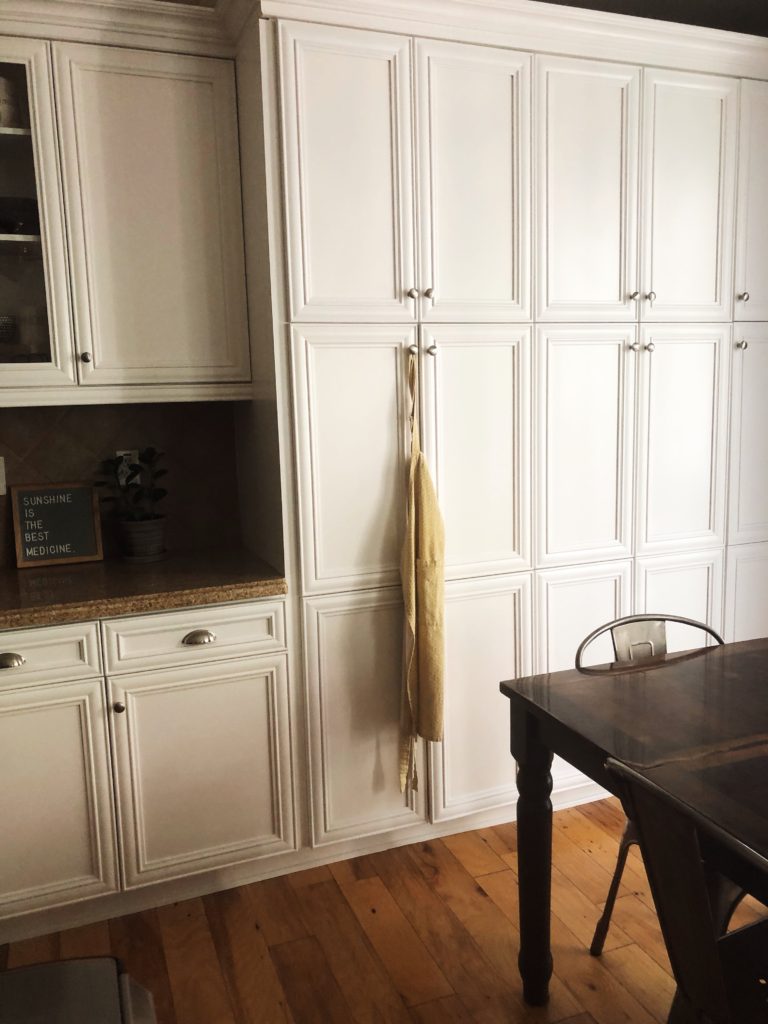
Here is the painted island with the new hardware. Also, my husband said, “I don’t like the grey”. Well, the island is staying grey and everything else is getting painted white. So here we go …. next up, alabaster by Benjamin Moore. A little variety makes life fun, right?
If you choose to spray your cabinets, you will need to thin your paint so I bought these containers to use for my thinned paint. Buy the lids as well because you will have a lot of time in-between coats and you don’t want your paint to dry out.
Once the initial ‘prep’ was done, I got to painting.
- Paint a coat of primer.
- Wait for it to dry and then sand with a fine grit sanding block.
- Paint a coat of regular paint. if you use a sprayer you will have to water it down. You will have to play with this and see what seems to work.
- Wait for the paint to dry and then sand lightly with a fine grit sanding block.
- Paint another coat. Wait for the paint to dry (notice the theme here? you are pretty much always waiting for paint to dry)
- Two coats worked great for the spray as it goes on thicker but when I painted with a brush or roller, it required 3 coats.
- Let the paint cure and then you can begin the process of putting everything back together.
- Enjoy the fruits of your labor!
I used these paint rollers (and these) and this paint brush. I had one brush for primer and another for the actual paint. I also bought new knobs and pulls from Amazon as they had the best deals for buying in bulk. Out with the bronze and in with the brushed nickel. I also picked up a new matching brushed nickel faucet which I am loving. Our old faucet was leaky and it looked pretty beat up.
A few things that I learned, sprayers take a bit of learning. Sometimes my paint would go on heavy and other times it seemed lighter. I love the Benjamin Moore Advance as it was self-leveling. If things seemed to drip off of the sides, I waited about 10 minutes and used a paper towel to wipe the excess before it was dry but once it was done being super runny. It seemed to level out again after that.
A few tips:
- Prep well – make sure that you have everything that you need before you start including painters tape, paint brushes, rollers, etc.
- Label EVERYTHING using a sharpie.
- Wrap your brushes in saran wrap in-between jobs. The brushes won’t dry out and it saves the hassle of repeatedly washing them out since you will be working consistently for at least a week. I also stick my paint trays in a plastic bag to keep them from drying out completely.
- Touch up paint is a lifesaver. You can easily come back and touch up light spots instead of repainting everything.
- Baby wipes are your best friend for quick clean-ups.
- Try to be patient to eliminate sloppy mistakes. This is a big job and quite the process.
My hardest lesson?
Bugs! For real. I set up my workspace in the garage and had the bottom of the garage door cracked for ventilation. This was not an issue until the last two nights! I had a couple of moths get stuck in my wet paint. I was able to get one out right away but the second one dried into the paint. I also had a giant mosquito eater dry into one of my last cabinets. I had to scrape that out and tried to sand but it’s still a bit bumpy. Funny enough, I did the lowers first thinking that if I had issues, at least it would be on my low cabinets and hardly visible. Nope. Those came out fab and some of my uppers have some flaws. Honestly, I don’t see them unless I look for them
I should also clarify that while small painting projects can be a bit cathartic, this was a big undertaking and I didn’t find joy in the journey. I do find great satisfaction in a completed project though. Painting all of my cabinets took me exactly 2 weeks but the money I saved by doing it myself was so worth it! To have someone paint my cabinets would likely cost me $5,000-6,000. This project cost me around $500 plus my time. So worth it? Yep!
Would you paint your entire kitchen or hire someone to do it?


Love that you went ahead with your vision even though hubby wasn’t quite on board. How’d he feel when you were all done? I want to redo my lower. Not happy with the navy blue. Amazing how your painted cabinets changed the whole mood of your kitchen.
He was actually fine with it! I think he thinks I am crazy for even jumping into such a huge project. He should know better! Ha ha